Laser Engraver for Metal Parts: Step-by-Step Selection and Setup Guide
A step-by-step guide to choosing a laser engraver for metal parts: compare beam types, prepare metal surfaces, manage workshop safety, and achieve clean marks.

On this page
Top picks at a glance
As an Amazon Associate I earn from qualifying purchases.
- 1
 xTool S1 40W Laser Cutter and Laser Engraver for Tumblers9.7/10View on Amazon
- 2
 ATOMSTACK Swift 12W Laser Engraver Cutter for Wood & Metal9.7/10View on Amazon
- 3
 xTool P2S 55W CO2 Laser Cutter9.7/10View on Amazon
- 4
 Longer RAY5 20W Laser EngraverView on Amazon
- 5
 ORTUR Laser Master 2 S2 LU2-10A Laser Engraver LaserView on Amazon
- 6
 Twotrees TTS-10 Pro Laser EngraverView on Amazon
- 7
 Twotrees TTS-20 Max 20000mW Laser Engraver and Cutter MachineView on Amazon
- 8
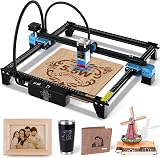 Twotrees TTS-55 Pro Laser Engraver 5500mW Laser EngravingView on Amazon
- 9
 Twotrees TTS-20 Pro Laser EngraverView on Amazon
Choosing a laser engraver for metal parts depends on your target metal and the beam wavelength required to mark it. Reflective bare metals like aluminum, brass, and copper require an infrared beam, a fiber laser, or marking compound, whereas bare stainless steel can be marked directly by higher-power diodes through surface oxidation. Coated metals and anodized aluminum mark directly with diode lasers by vaporizing the coating. Below is the step-by-step process.
Other machines to compare
 Longer RAY5 20W Laser EngraverCheck price on Amazon
 ORTUR Laser Master 2 S2 LU2-10A Laser Engraver LaserCheck price on Amazon
 Twotrees TTS-10 Pro Laser EngraverCheck price on Amazon
 Twotrees TTS-20 Max 20000mW Laser Engraver and Cutter MachineCheck price on Amazon
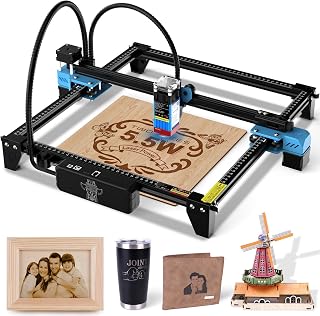 Twotrees TTS-55 Pro Laser Engraver 5500mW Laser EngravingCheck price on Amazon
 Twotrees TTS-20 Pro Laser EngraverCheck price on Amazon
LaserEngraveHQ earns a commission from purchases made through these links, at no extra cost to you. Read our affiliate disclosure.
Higher-power diode lasers can mark bare stainless steel through surface oxidation, but reflective bare aluminum, brass, or copper require specialized marking spray or an infrared beam. Lower-power diodes also require marking spray for raw metals.
Step 1: Identify your metal parts and surface coatings
Identify your target metal before choosing equipment. Metals divide into distinct categories: bare alloys, anodized aluminum, and coated blanks. Each responds differently to laser energy, as outlined in our guide to types of laser engraving.
Reflective metals like bare aluminum, brass, and copper dissipate heat rapidly, preventing direct diode contrast. Bare stainless steel absorbs sufficient energy for direct marking via oxidation on higher-power units. Anodized aluminum features a sealed dye layer that vaporizes under the beam to reveal crisp white graphics. Painted or powder-coated blanks expose the base metal once the coating is ablated.
Step 2: Match the laser beam type to your metal
Selecting an appropriate beam source is critical. Small shops choose between diode, infrared, and fiber units. Compare models in our guide to the best laser engraver for metal.
Diode lasers provide an accessible entry point. The Longer Ray5 10W listing specifies a 10W optical output module with 60W electrical input, while the Longer RAY5 20W listing states a 20000mW optical output module with 130W electrical input. The ELIDOR Z6 listing specifies a 6W (6000mW) laser module with a 0.04 × 0.14 mm spot, and the Artilume listing states a 7W diode output. Higher-power diode units mark bare stainless steel directly through oxidation. Lower-power units require chemical assistance: the Artilume listing explicitly states that marking spray is required for bare metal. Compact entry units omit metal entirely: the LaserPecker LP1 Plus listing explicitly states that metal engraving is not supported.
Infrared beams mark bare metal directly. The AlgoLaser Pixi listing specifies a 1064nm infrared laser engraver with a 0.04 x 0.05 mm spot for metal tags, jewelry, and nameplates. Dual-laser systems combine both: the xTool F2 listing specifies a 5W IR (5000mW output) infrared beam paired with a 15W diode (15000mW output) module. For mechanical etching without optics, the General Tools model 505 listing specifies a cordless engraving pen with a 3/32″ diamond tip bit and a 20,000 RPM motor powered by 2 AAA batteries.
Step 3: Select working area and machine structure
Part dimensions dictate required bed size. Small metal tags and jewelry fit on compact engravers, while larger panels require open gantry frames. For machine formats, see our laser engraver for beginners guide.
Bed dimensions vary across listings. The Longer Ray5 10W listing specifies a 400x400mm working area, while the Longer RAY5 20W listing provides a 400x365mm work area. The ELIDOR Z6 listing specifies a 300×300mm (11.8″ × 11.8″) working area, and the Artilume T1 listing features a 200x150mm working space. For compact desktop setups, the AlgoLaser Pixi listing cites dimensions of 265 x 214 x 196 mm with a weight of approximately 3 kg (listed as 6.6 pounds in its spec table).
Step 4: Prepare the metal surface for marking
Clean surfaces are mandatory. Machining oils, fingerprints, and oxidation disperse the beam and cause blotchy marks. Degrease the target metal thoroughly with isopropyl alcohol or acetone, then let it dry completely.
When using laser marking spray on bare metal, apply an even, thin coat across the target area. An overly thick layer insulates the metal, while an overly thin layer yields faint contrast. Allow the spray to dry to a chalky finish before engraving. After processing, rinse the part under water: the bonded marking remains permanently fused while loose residue washes away.
Step 5: Configure speed, power, and focal distance
Proper settings ensure crisp marks without scorching coatings. Configure these parameters in control software, as outlined in our overview of laser engraving software for beginners.
Linear speed depends on the drive mechanism. Galvo systems move rapidly: the xTool F2 listing states a maximum rated speed of 6000mm/s with 0.00199″ motion accuracy. Gantry systems run at lower speeds: the ELIDOR Z6 and Artilume T1 listings cite speeds up to 10,000 mm/min with 0.01mm precision, while the Longer RAY5 20W listing cites speeds up to 24,000 mm/min. As the Artilume listing notes, operators adjust speed based on material: slower for deep engraving, faster for light marking.
Accurate focus concentrates beam energy. Listings note specific focal tools, such as the LaserPecker LP1 Plus listing specifying a 200 mm distance between lens and material surface using an included ruler on supported materials. Precise focus ensures machines achieve stated precision, such as the 0.01mm precision listed by Longer, Artilume, and ELIDOR. Always verify focus on a sample blank.
Step 6: Set up workshop ventilation and eye protection
Metal processing demands strict safety. Vaporized coatings, heated metals, and marking sprays release airborne particulates. Exhaust fumes outdoors or install an air cleaner, such as models reviewed in our guide to the best fume extractor for laser engraver units. Commercial shops follow OSHA ventilation guidelines.
Certified eye protection is mandatory. Safety glasses must specify an optical density (OD) rating matching your machine’s wavelength. Blue diode lasers require protection against visible blue radiation, while infrared and fiber units operating at 1064nm demand near-infrared lenses. Unrated tinted shields offer no certified protection.
Machine listings disclose regulatory classifications overseen by the FDA Center for Devices and Radiological Health (CDRH). For example, Longer Ray5 10W states Class II, Longer RAY5 20W states laser class ii, and xTool F2 states Class 4. Never engrave hazardous plastics: PVC, vinyl, PVC-based faux leather, polycarbonate, or ABS release corrosive hydrochloric acid and toxic fumes.
Step 7: Inspect and clean the finished metal marks
Allow metal parts to cool before handling. If marking compound was applied, rinse the cooled workpiece under water and wipe away loose residue with a cloth. The fused mark resists solvents, water, and friction.
Inspect the completed mark under bright light to verify edge sharpness and contrast. Check that text, numbers, and logos remain clear. If the mark appears faint, decrease speed, increase optical power, or adjust focus. Record confirmed settings for each alloy for consistent repeat production runs.
Common mistakes to avoid
- Attempting to mark reflective bare metal with a low-power diode laser without marking spray.
- Relying on unrated acrylic shields instead of certified wavelength-matched safety glasses.
- Failing to degrease metal parts before applying laser marking spray.
- Placing prohibited plastics like PVC, vinyl, or ABS inside the work area.
- Operating in unventilated rooms without outdoor exhaust or certified filtration.
- Confusing electrical input wattage with actual optical output power when reviewing specifications.
Laser engraver for metal parts: the short version
- Identify if your metal is bare alloy, anodized aluminum, or coated.
- Choose a beam source: an infrared laser, a fiber unit, or a diode with marking spray for reflective metals.
- Confirm bed size accommodates your parts.
- Clean the surface with solvent to remove grease.
- Calibrate speed, power, and focus on a sample blank.
- Run ventilation and wear certified, wavelength-matched safety glasses.
- Cool, rinse off any spray residue, and verify mark durability.
Routine calibration follows: log settings for each alloy and keep optics clean.
FAQ: lasers and CNC
Can a diode laser engrave metal parts directly?
It depends on the metal and power. Diode lasers mark anodized aluminum and painted metal directly by vaporizing the coating. Higher-power units also mark bare stainless steel directly through oxidation. Reflective bare metals like raw aluminum, brass, and copper require marking spray. For diode details, read our guide on can 10W laser engrave metal.
What type of laser is best for bare metal parts?
Infrared and fiber lasers are ideal for bare metal. Their 1064nm wavelength is absorbed efficiently, producing permanent marks without sprays. Compare systems in our guide to the best fiber laser engraver models and our breakdown of what is a fiber laser engraver.
What is the difference between optical laser power and electrical power?
Optical power is actual beam output, while electrical power is total power drawn from the outlet. Listings highlight electrical input, like a 60W or 130W rating, while the optical module delivers 10W or 20W. Always evaluate engraving capability by optical output wattage.
Which metals are easiest to mark with a desktop laser?
Anodized aluminum marks easily because the beam vaporizes the dye layer, yielding bright white contrast. Stainless steel is also widely marked through surface oxidation. For blank choices, see our guide to the best metal for laser engraving and our review of stainless steel blanks for laser engraving.
Do I need special safety glasses for metal laser engraving?
Yes. Eyewear must state an optical density (OD) rating for your specific wavelength. Blue diodes require visible blue protection; 1064nm infrared and fiber lasers require near-infrared lenses. Unrated shields offer no verified protection. Read how to choose laser safety glasses for guidance.
Can a desktop laser cut metal parts?
Desktop lasers cannot cut structural metal. While select diode machines cite cutting thin foils, like the 0.05mm stainless steel cited for the Longer RAY5 20W, metal fabrication requires industrial fiber cutters. Desktop units are marking tools. For equipment advice, see our guide on how to choose a laser engraver.
Related: the laser engraver hub, our guide to the fiber laser engravers category and our overview of diode laser engravers. Also see our laser safety section.



