Heat Set Insert Temperature Guide for 3D Prints
Set the iron inside the range the maker states, seat the insert straight, and let the plastic cool before you drive a screw.

On this page
Top picks at a glance
As an Amazon Associate I earn from qualifying purchases.
- 1
 Vertical Heat Set Insert Tool with 90W Soldering9.5/10View on Amazon
- 2
 Vertical Heat Set Insert Tool Press for Plastic9.5/10View on Amazon
- 3
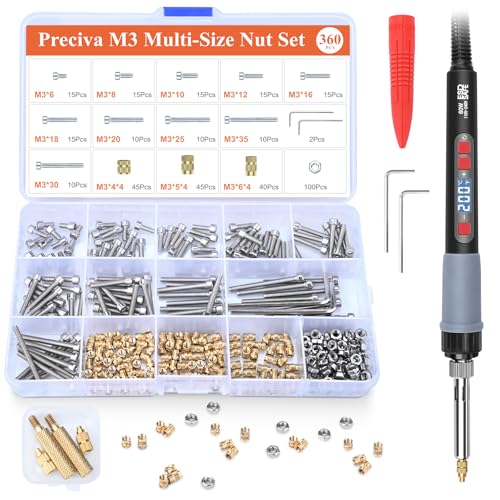 Preciva Threaded Inserts Screw Kit9.4/10View on Amazon
- 4
 Vibit 152 Pcs Heat Set Inserts Kit for 3D Printing9.4/10View on Amazon
A threaded insert gives a printed part a metal thread that holds a screw. The insert goes in hot and the plastic grips it as it cools, giving the screw a metal thread to hold. Heat set insert temperature is one of the settings that affects whether that joint holds or the plastic around it melts out of shape.
LaserEngraveHQ earns a commission from purchases made through these links, at no extra cost to you. Read our affiliate disclosure.
No listing here names a temperature per plastic. The numbers below come from the iron ranges and insert ratings the makers state.
Vertical Heat Set Insert Tool with 90W Soldering
A vertical press with a 90W digital iron, tips from M2 to M8, a built-in drawer and M3 inserts in the box.
Pros
- 90W iron, 180 to 500 degrees Celsius, with a real-time display
- Tips cover M2 to M8 and swap by unscrewing the tip head
- Built-in drawer stores tools, screws and inserts at the bench
- 30 M3 inserts included in the box
Cons
- No insertion height stated for tall parts
- Only M3 inserts included
- Bench frame needs dedicated bench space
- No weight stated
Vertical Heat Set Insert Tool Press for Plastic
A vertical press with a 60W iron, tips from M2 to M8 and room for parts up to 210mm tall.
Pros
- Iron adjusts from 180 to 500 degrees Celsius, Celsius or Fahrenheit
- Press frame takes parts up to 210mm tall
- Quick-change tips cover M2 to M8
- Aluminum frame keeps the press light for its size
Cons
- No warranty term is stated
- Bench frame needs dedicated bench space
- Parts taller than 210mm do not fit the frame
- Tips cover M2 to M8 only
Preciva Threaded Inserts Screw Kit
An M3 kit with a 60W digital iron, brass inserts, bolts, nuts and spare tips, 360 pieces of hardware.
Pros
- 130 inserts, 130 bolts and 100 nuts, 360 pieces of hardware
- 60W digital iron, 200 to 500 degrees Celsius, 392 to 932 Fahrenheit
- Brass inserts, listed for corrosion resistance and thermal conductivity
- Split tip design swaps tips without unscrewing the iron sleeve
Cons
- No warranty term is stated
- M3 inserts only
- No press frame, so seating depth is hand-controlled
- Inserts are brass only
Vibit 152 Pcs Heat Set Inserts Kit for 3D Printing
A 152-piece M3 brass insert kit in 3 sizes, with a soldering tip and an adapter.
Pros
- 152-piece kit with M3 inserts in 3 sizes
- Brass inserts rated up to 300 degrees Celsius
- Knurled grip resists twisting and slipping
- Soldering tip and adapter included in the kit
Cons
- No soldering iron included
- M3 inserts only
- No press frame, so seating depth is hand-controlled
- Inserts are brass only
Heat Set Insert Temperature: What the Listings State
The Mintion and 3DZWMAN irons (on Amazon) list 180 to 500 degrees Celsius, the Preciva iron lists 200 to 500 degrees Celsius, and the brass inserts in the Vibit kit (on Amazon) are rated up to 300 degrees Celsius. No listing names a temperature per plastic.
Heat set insert temperature works as a balance. Too cool and the insert can stop before it seats. Too hot and the plastic around the insert can melt away, leaving a loose pocket. A setting that seats the insert flush lets the plastic close around the insert as it cools. Only the Vibit listing here states knurls for its inserts.
Step 1: Match the Insert to the Screw
Pick the insert size from the screw the part needs. The inserts included here are M3, in the Preciva, Mintion and Vibit kits, so an M3 screw pairs with those inserts. The Mintion and 3DZWMAN presses take tips from M2 to M8; the Preciva kit includes M3 tips. Check the screw size before heating the iron, since the hole and the insert size have to match.
Step 2: Heat the Iron and Seat the Insert
Set the iron inside its stated range and let it reach the setting. The Mintion iron (on Amazon) shows the temperature on a real-time display. The 3DZWMAN iron switches between Celsius and Fahrenheit, and the Preciva iron switches between Celsius and Fahrenheit with two presses. Hold the press or the iron straight over the hole, press the insert down in a smooth motion, and stop when it sits flush with the surface.
Step 3: Let the Joint Cool and Check the Thread
Leave the part alone while the plastic cools and grips the insert. Driving a screw while the plastic is still soft can turn the insert in its pocket, so wait until the part has cooled. Then drive the screw in by hand and check that it turns in the metal thread without turning the insert with it.
Gear for Heat Set Inserts
The irons in the picks below set the heat set insert temperature, and the presses among them hold the insert straight for the heating and seating steps above. The Vibit kit pairs its inserts and tip with a separate iron.
FAQ: lasers and CNC
What temperature do heat set inserts need?
Use a setting inside the range the iron maker states: the Mintion and 3DZWMAN irons list 180 to 500 degrees Celsius, the Preciva iron lists 200 to 500 degrees Celsius, and the Vibit brass inserts are rated up to 300 degrees Celsius. When the Vibit inserts are used, keep the setting at or below the insert rating the maker states, even though the irons list higher settings.
Can the same temperature be used for PLA, PETG and ABS?
The makers list different plastics for each kit, and none names a separate temperature per plastic, so the listings do not support one setting for every plastic. The Mintion and 3DZWMAN makers list PLA, PETG and ABS among their compatible materials. The Preciva maker lists PLA, ABS and nylon. Use the range for the iron in hand and the plastics its maker lists.
Is a press needed, or is a soldering iron enough?
An iron fitted with an insert tip seats inserts without a press frame, and the Preciva kit pairs its iron with M3 tips for that job. A press holds the iron straight and keeps the insert square to the part. The Mintion and 3DZWMAN presses add a frame for that work, while the Vibit kit holds inserts with a soldering tip and an adapter and includes no iron or frame.
What insert sizes do these kits cover?
The Mintion and 3DZWMAN presses take tips from M2 to M8. The inserts included are M3: the Preciva kit holds M3 inserts, bolts and nuts, the Vibit kit holds M3 inserts in 3 sizes, and the Mintion press includes M3 inserts. The 3DZWMAN listing does not list inserts in the box.
How can you tell the insert is seated right?
A seated insert sits flush with the surface. The screw should turn in the metal thread by hand and hold when tightened, without turning the insert with it. If the insert turns with the screw, the pocket is too loose for that insert; reheating the same pocket does not make the pocket smaller.
Related: the 3D printers hub.