Red vs Blue Laser Engraver: Which One Should You Buy?
A workshop comparison of red and blue laser engravers explaining beam differences, alignment pointers, cutting limits, and material compatibility for makers.

On this page
Top picks at a glance
As an Amazon Associate I earn from qualifying purchases.
- 1
 Monport 60W Fiber Laser Engraver with Rotary Axis & Lightburn9.5/10View on Amazon
- 2
 xTool S1 40W Laser Cutter and Laser Engraver for Tumblers9.7/10View on Amazon
- 3
 Twotrees TS2 Laser Engraver9.5/10View on Amazon
- 4
 ATOMSTACK Swift Laser Engraver MachineView on Amazon
- 5
 Brilliance Laser Inks Copper-Tone Red Liquid-Ready MarkingView on Amazon
- 6
 Tondiamo 3 Pcs Laser Rubber Stamp SheetView on Amazon
- 7
 Trotec TroLaseView on Amazon
- 8
 Economical Red Dot Laser ModuleView on Amazon
- 9
 Cloudray Diode Module Red Dot Set Hole Diameter 24mmView on Amazon
When deciding between a red vs blue laser engraver for signs, tumblers, leather patches, or cut parts, the main difference comes down to the beam’s working role: a blue laser is a genuine cutting and engraving diode beam that processes wood, leather, dark acrylic, and coated metal, while the term red laser in desktop shops typically refers either to a visible red alignment pointer that cannot cut, or colloquially to an infrared beam module engineered for bare metal marking. For most craft makers and small workshop owners, a blue diode engraver is the primary machine to buy because it processes common organic materials and cuts thin craft boards directly. The sections below walk through each step in order, explaining how these beam technologies differ, where framing pointers cause confusion, and how to select the right setup for your projects.
Other machines to compare
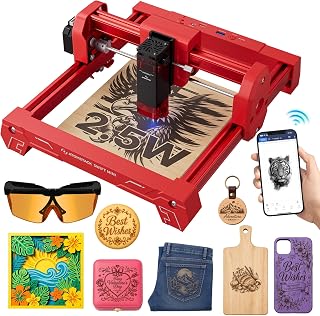 ATOMSTACK Swift Laser Engraver MachineCheck price on Amazon
 Brilliance Laser Inks Copper-Tone Red Liquid-Ready MarkingCheck price on Amazon
 Tondiamo 3 Pcs Laser Rubber Stamp SheetCheck price on Amazon
 Trotec TroLaseCheck price on Amazon
 Economical Red Dot Laser ModuleCheck price on Amazon
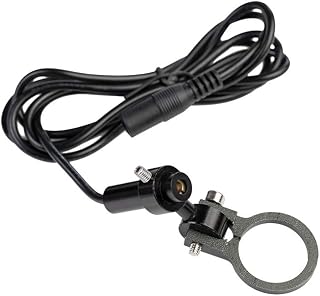 Cloudray Diode Module Red Dot Set Hole Diameter 24mmCheck price on Amazon
LaserEngraveHQ earns a commission from purchases made through these links, at no extra cost to you. Read our affiliate disclosure.
Many desktop machines feature a red pointer dot alongside the primary cutting head. That visible red dot serves purely as an optical guide for positioning your workpiece, not as an engraving beam. Confirm stated optical wattage in the machine listing before buying.
Step 1: Understand how beam wavelengths interact with materials
Laser engraving relies on material absorption. When a laser fires, the workpiece must absorb that specific light wavelength to generate heat, produce dark marks, or cut through fibers. A beam that reflects off the surface or passes straight through cannot mark the piece effectively.
Blue diode lasers emit visible blue light. SCULPFUN notes on its C1 that the magnetic protective cover filters wavelengths from 100–500nm, which covers ultraviolet through visible blue diode light. Materials like wood, leather, paper, slate, and dark acrylic absorb blue light efficiently. The concentrated energy chars wood fibers or vaporizes acrylic pigments cleanly. In contrast, highly reflective metals like polished brass and copper reflect blue light and require marking spray, while dense stainless steel can be marked by tightly focused diodes through surface annealing. Clear acrylic and untreated clear glass allow visible blue light to pass straight through without absorbing energy, meaning a blue diode cannot cut clear acrylic or mark plain glass directly without a surface coating. If you need help choosing a machine class, read how to choose a laser engraver first.
Step 2: Distinguish red alignment pointers from active engraving beams
A frequent point of confusion for new buyers is the visible red dot present on many desktop engravers. In standard diode machines, this red light is not an engraving laser. It is a low-power alignment diode used solely for framing your design perimeter and verifying focal height on your material surface.
An alignment pointer delivers minimal energy and cannot mark wood or metal. In contrast, true metal-marking systems that users informally call red lasers operate in the near-infrared spectrum. Understanding whether a listing describes an active cutting beam, an infrared marking module, or simply a red framing guide prevents expensive purchasing mistakes. If your goal is metal marking, see our guide on can a diode laser engrave metal.
Step 3: Evaluate blue diode capabilities for organic blanks and cutting
Blue diode lasers are the most popular choice for makers creating custom signs, engraved drinkware, and leather goods. Because organic materials absorb blue light readily, a blue diode creates crisp, dark engravings on plywood, hardwood blanks, and vegetable-tanned leather.
Blue diodes also deliver practical cutting capability on thin craft stock, though performance depends heavily on optical power. Artilume lists a 7W diode output on its T1 capable of cutting up to 4mm basswood with multiple passes across a 200x150mm working area, while noting rated engraving speeds up to 10000mm/min that require adjustment for different materials. Similarly, ATOMSTACK lists a rated engraving speed of 400 mm/s and a 300 x 300 mm work area for its Swift model, stating a 7W laser power in its title (though marketing bullets cite 70000 mW and the spec table lists 5000 Milliwatts). For metal items, blue laser engraving stainless steel is possible on sufficiently powered units because focused heat can create surface annealing, or makers can pre-treat blanks with marking spray as Artilume suggests. Conversely, compact entry-level units cannot mark metal: LaserPecker lists a 200 mm focal distance on its LP1 Plus stand while explicitly stating that bare metal engraving is not supported on that machine. Learn practical techniques in our guide to how to engrave stainless steel with a diode laser, or check our best laser engraver for wood picks.
Step 4: Assess red and infrared lasers for bare metal marking
While blue diodes handle organic materials and surface annealing, they struggle with raw, reflective metals like brass, copper, and bare aluminum. Near-infrared marking lasers, often grouped under the red laser label in craft forums, interact directly with bare metals.
The infrared beam couples with free electrons in metal surfaces, producing high-contrast marks and fine serial text without requiring pre-treatment sprays. However, infrared lasers pass through or fail to mark wood, leather, and clear acrylic cleanly. If your business focuses strictly on jewelry, knife blades, or brass plaques, an infrared unit is superior. Read our comparison of fiber vs diode laser for metal and our roundup of the best laser engraver for metal to evaluate these options.
Step 5: Compare cutting depth, rated speed, and spot precision
Beyond material compatibility, machine mechanics determine your daily workshop output. A machine with a fine focal spot produces sharper photo engravings and cleaner text on small gift tags and leather patches.
Focal spot dimensions and mechanical precision vary between models: SCULPFUN lists a 0.04mm fine spot and 3W output on its C1 across a 150×130mm area, while BlazeX lists 0.01mm motion precision alongside a 10W optical output on its M3. Blue diodes excel at cutting craft plywood and sheet stock, whereas infrared marking lasers are designed purely for shallow surface engraving. Always separate optical output from electrical input: high input draw does not mean equivalent cutting power at the workpiece. Review the difference in our guide to optical power vs electrical power laser engraver and browse options on our laser engraver hub.
Step 6: Match workshop safety gear to specific beam hazards
Laser safety is mandatory for every workshop. Eye protection must match the specific wavelength of your machine. Eyewear rated for blue light does not protect against infrared beams, and orange acrylic shields designed for blue diodes offer zero defense against infrared radiation.
Enclosures provide critical containment. BlazeX lists a Class 1 safety enclosure on its M3 with automatic stop sensors if the lid opens or if the machine tilts. Fume management is equally essential: never engrave or cut PVC, vinyl, PVC faux leather, polycarbonate, or ABS, as these materials release hazardous chlorine gas and corrosive vapors. Review the full list in our guide to materials you should never laser cut, equip certified glasses using our laser safety glasses guide, and install proper extraction with our fume extractor guide.
Step 7: Choose the right machine for your project catalog
Choosing your machine comes down to your primary product catalog. Match the laser beam technology to the materials you intend to process most frequently.
If your workshop focuses on wood signs, personalized leather wallets, slate coasters, and dark acrylic gifts, buy a blue diode laser engraver. It provides the broadest material versatility, cuts thin craft boards, and keeps equipment costs manageable. If your business focuses entirely on bare metal tags, jewelry, or knives, invest in a dedicated infrared or fiber marking machine. For beginners starting out, explore our best laser engraver for beginners guide before making a final investment.
Common mistakes to avoid
- Assuming a red framing pointer is an active engraving or cutting beam.
- Expecting a blue diode to engrave bare brass or copper without marking spray.
- Wearing blue diode safety glasses while operating an infrared laser module.
- Attempting to cut clear acrylic sheets with a visible blue laser beam.
- Confusing total electrical input draw with true optical laser output power.
- Operating any laser machine without dedicated exhaust ventilation or fume filtration.
Red vs blue laser engraver: the short version
- Identify whether your products require organic cutting or bare metal marking.
- Buy a blue diode laser engraver for wood, dark acrylic, leather, and craft cutting.
- Choose an infrared marking laser if bare metal personalization is your main niche.
- Confirm that any red light on a budget engraver is an active beam rather than a framing dot.
- Match protective safety eyewear to the exact operating wavelength of your laser.
- Set up proper ventilation and never process banned vinyl or PVC materials.
Matching beam physics to your project blanks ensures clean results, safe operation, and consistent workshop output.
FAQ: lasers and CNC
Can a blue laser engraver cut wood?
Yes, higher-power blue diode lasers can cut thin craft wood like basswood and plywood. For example, Artilume lists a 7W diode output on its T1 capable of cutting up to 4mm basswood using multiple passes. Lower-power units may only engrave, as cutting depth depends heavily on optical output wattage, focal setup, and multi-pass settings.
Can a blue laser engrave metal?
A blue diode laser cannot deeply carve bare metals, but blue laser engraving stainless steel is achievable by creating surface annealing marks with tight focus on sufficiently powered units, or by applying laser marking spray on bare metal blanks.
What is the red light on my laser engraver?
On most desktop diode and CO2 machines, the visible red light is an alignment guide or framing pointer. It indicates the perimeter of your design on the workpiece but does not produce enough energy to mark or cut material.
Is a red laser better than a blue laser for metal?
Infrared marking lasers, often called red lasers in workshop discussions, are far better for bare metals like brass, aluminum, and steel because metal absorbs infrared wavelengths readily. Blue diode lasers reflect off reflective metals like copper and brass unless pre-treated with marking spray, though tightly focused blue diodes can anneal bare stainless steel.
Can a blue diode laser cut clear acrylic?
No. Blue diode light passes directly through clear acrylic without absorption. To cut or mark clear acrylic cleanly, a CO2 laser is required, though blue diodes can readily cut and engrave dark or opaque cast acrylic sheets.
Do blue and red lasers use the same safety glasses?
No. Laser safety glasses must match the exact wavelength of the beam. Eyewear designed to block blue diode light will not protect your eyes against infrared radiation. Always verify the stated wavelength coverage and optical density on your safety gear.
Related: the laser engraver hub, our guide to how to choose a laser engraver, and the diode laser engravers category. For material techniques, see how to engrave stainless steel with a diode laser, our breakdown on can a diode laser engrave metal, and fiber vs diode laser for metal. For workshop shopping, explore the best laser engraver for wood, the best laser engraver for metal, and the best laser engraver for beginners.



