How to Use a Soldering Tool: A Beginner Guide
A beginner guide to using a soldering tool: set up the bench, tin the tip, heat the joint, feed the solder and check the bond, with four kits compared.

On this page
Top picks at a glance
As an Amazon Associate I earn from qualifying purchases.
- 1
 X-Tronic 3060-PRO • 75W Soldering Iron Station Kit9.7/10View on Amazon
- 2
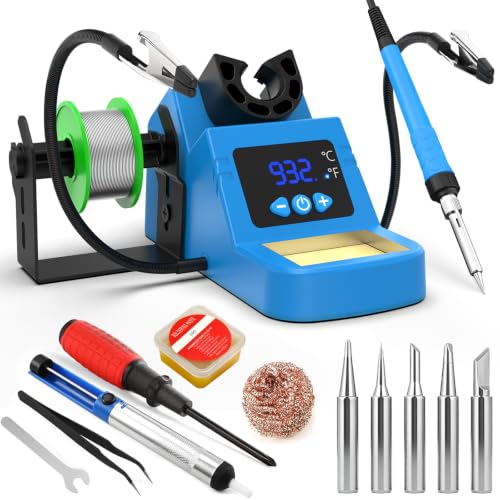 Soldering Station, 130W Digital Display Soldering9.6/10View on Amazon
- 3
 Soldering Iron Kit, 100W High Power LCD Digital9.5/10View on Amazon
- 4
 Soldering Iron Kit, 90W 110V LCD digital soldering9.4/10View on Amazon
A loose wire on a circuit board, a broken joint in a small device, or a jewelry link that needs one more connection: each of these jobs comes down to heating the joint, feeding in solder, and letting it cool into a clean bond. Learning how to use a soldering tool means learning that sequence: tin the tip, heat the parts, feed the solder, and hold still while the joint sets. The steps below walk through the whole job, from setting up the bench to checking the finished joint.
LaserEngraveHQ earns a commission from purchases made through these links, at no extra cost to you. Read our affiliate disclosure.
X-Tronic 3060-PRO • 75W Soldering Iron Station Kit
A 75W soldering station with a 60W iron, PID temperature control, 3 presets and a full bench kit with a mini mag lamp and 4 helping hands.
Pros
- 75W station with a 60W iron and PID temperature control
- Temperature range 194 to 896°F with 3 presets and plus or minus 3.6°F stability
- 5 extra tips, mini mag lamp and 4 helping hands in the box
- 3-year warranty with lifetime support from the maker
Cons
- 60W iron output is lower than the 130W Crtsweker station
- 110V only, with no 220V option stated
- Station measures 9.0 by 6.0 by 4.5 in, so it takes bench space
- Carries a California lead exposure warning for chemicals including lead
Soldering Station, 130W Digital Display Soldering
A 130W digital soldering station with 2 helping hands, auto sleep and a complete accessory kit for bench soldering.
Pros
- 130W station with a range of 356 to 932°F
- 2 helping hands, stand and solder wire holder in one unit
- Auto sleep with adjustable sleep time from 60 to 999 seconds
- Complete kit with 5 tips, solder sucker, sponge and tweezers
Cons
- No warranty term is stated
- No magnifying glass is included for tiny parts
- Station format suits a fixed bench more than a portable kit
- Helping hands, stand and wire holder are fixed in one unit
Soldering Iron Kit, 100W High Power LCD Digital
A 100W LCD soldering iron kit with a magnifying glass stand, crocodile clips and auto sleep for close-up work.
Pros
- 100W iron with a range of 356 to 932°F
- Magnifying glass stand with 2 crocodile clips for tiny parts
- Automatic sleep mode after 10 minutes on the stand
- Ceramic cores with 4 air vents to prevent overheating
Cons
- No warranty term is stated
- Only 3 soldering tips, fewer than the 5-tip kits here
- Pen format suits light work more than a full station
- No solder sucker is included
Soldering Iron Kit, 90W 110V LCD digital soldering
A 90W LCD soldering iron kit with 5 tips, solder wire, paste and a pump for basic circuit board work.
Pros
- 90W iron with a range of 180 to 480°C
- LCD display shows the temperature status
- 12-in-1 kit with 5 tips, solder wire, paste and a pump
- Silicone handle with 6 ventilation holes for cooling
Cons
- 90W iron is lower than the 130W Crtsweker station
- No auto sleep mode is stated
- Simple holder only, with no helping hands
- No magnifying glass for tiny parts
Step 1: Set up the bench
Clear a heat-proof surface and set the iron in its stand, with the solder, a sponge or brass wool, and the parts within reach. Clip the work in helping hands or a holder so both of your hands stay free. Good light matters more than a big bench: a magnifier on the stand helps with tiny joints. The best solder helping hands guide lists holders for kits without them.
Step 2: Tin the tip and set the temperature
Plug in the iron and let it reach the set temperature. Wipe the tip on a damp sponge or brass wool, then melt a little solder onto the tip until it coats evenly: this is tinning, and a tinned tip passes heat to the joint. Check the manual for your iron before you start.
Step 3: Heat the joint and feed the solder
Hold the tinned tip against the joint so the parts heat together, then touch the solder to the joint, not to the tip. Feed in just enough solder to coat the joint, then lift the solder wire away and lift the iron away, and hold the joint still while the solder cools and sets. A good joint looks smooth, with the solder flowing around the wire and the pad. If the solder balls up, the parts were not hot enough.
Step 4: Check the joint and clean up
Look at each joint once it cools: it should hold the wire firm, with no cracks and no loose strands. Wipe the tip clean before you put the iron back in its stand. Let the iron cool in the stand. If a joint looks cracked, heat it again and feed in a little fresh solder.
Staying safe while you solder
Soldering makes fumes, so work in a ventilated space or with a fume extractor pulling the smoke away from your face. Wear eye protection, keep the hot tip away from skin and cords, and rest the iron in its stand whenever it leaves your hand. Work on a heat-proof surface, and remember that lead solder is not for food-contact items.
The gear for this job
A station with helping hands holds the work while you heat the joint, a magnifier helps with tiny parts, and an auto sleep mode drops the temperature when the iron sits idle.
Common mistakes to avoid
- Heating the solder instead of the joint, so it balls up and never bonds.
- Moving the joint before the solder sets, which cracks the bond.
- Skipping the tinning step, so the tip stops passing heat.
- Using a dirty tip, which leaves weak joints.
- Leaving the iron on the bench instead of in its stand.
How to use a soldering tool: the short version
- Set up the bench with the iron in its stand.
- Tin the tip and set the temperature.
- Heat the joint, feed the solder, and hold still.
- Check the joint once it cools.
- Clean the tip and let the iron cool in its stand.
FAQ: lasers and CNC
What temperature should I set my soldering iron to?
Set it from the range your iron states. The MEAKEST kit (on Amazon) adjusts from 180 to 480°C, the Crtsweker and Aucanla kits adjust from 180 to 500°C, and the X-Tronic station (on Amazon) adjusts from 90 to 480°C. Check the manual for your iron before you pick a setting.
How do I tin a soldering iron tip?
Wipe the hot tip on a damp sponge or brass wool, then melt a little solder onto the tip until it coats evenly. The Crtsweker kit has a cleaning sponge and a tip cleaner, and the X-Tronic kit has a brass sponge with flux and a wet sponge.
Do I need helping hands to solder?
They help, but they are not required. The Crtsweker station has 2 helping hands, the X-Tronic station has 4, and the Aucanla kit (on Amazon) has 2 crocodile clips on its stand. Helping hands hold the work steady while you heat the joint.
How do I clean a soldering iron tip?
Wipe the tip on a damp sponge or brass wool while it is hot, then tin it again before you put the iron away. The Crtsweker kit has a cleaning sponge and a tip cleaner, the Aucanla kit has brass wool and a cleaning sponge, and the X-Tronic kit has a brass sponge with flux and a wet sponge.
Related: the electronics making hub and the soldering hub. Also see the best soldering iron for beginners, the best soldering iron kit and the soldering iron tips guides. Also see the cleaning soldering iron tips guide.