Laser Engraver for Beginners: A Step-by-Step Starter Guide
A complete guide to choosing a laser engraver for beginners: understand diode, CO2 and fiber models, evaluate wattage and workspace size, and set up your machine safely.

On this page
Top picks at a glance
As an Amazon Associate I earn from qualifying purchases.
- 1
 Laser Engraver 5.5W Enclosed 300×300mm Engraving Area Class 19.6/10View on Amazon
- 2
 Glowforge Aura 6W Laser Engraver & Cutter with HD Camera &9.6/10View on Amazon
- 3
 Laser Engraver9.4/10View on Amazon
- 4
 Laser Engraver 7000mW Laser Engraving Machine 200x150mm WorkView on Amazon
- 5
 WIZMAKER Wand MINI 2.5W Laser EngraverView on Amazon
- 6
 SCULPFUN S6 Pro 5500mW Laser Engraver & Cutter for BeginnersView on Amazon
- 7
 6W Laser Engraver for BeginnersView on Amazon
- 8
 BlazeX M3 10W Laser Engraver MachineView on Amazon
- 9
 AlgoLaser 10W Laser Engraver Machine with 3.5" SmartView on Amazon
A laser engraver for beginners is a compact desktop machine, typically powered by a diode laser, designed to engrave craft materials like wood, leather, paper and dark acrylic, with the ability to cut thin wood and paper on capable units without complex setup. For first-time makers, the right machine balances manageable optical power, an accessible software workflow and essential safety features like tilt shutoff and eye protection. Choosing a laser engraver for beginners comes down to selecting the right laser technology, matching optical wattage to your projects, sizing your workspace and establishing safe operating practices from the start.
Other machines to compare
 Laser Engraver 7000mW Laser Engraving Machine 200x150mm WorkCheck price on Amazon
 WIZMAKER Wand MINI 2.5W Laser EngraverCheck price on Amazon
 SCULPFUN S6 Pro 5500mW Laser Engraver & Cutter for BeginnersCheck price on Amazon
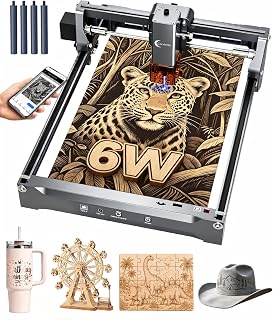 6W Laser Engraver for BeginnersCheck price on Amazon
 BlazeX M3 10W Laser Engraver MachineCheck price on Amazon
 AlgoLaser 10W Laser Engraver Machine with 3.5" SmartCheck price on Amazon
LaserEngraveHQ earns a commission from purchases made through these links, at no extra cost to you. Read our affiliate disclosure.
Optical output power is what cuts and marks your material, not the electrical input wattage listed on the machine frame. Always confirm the diode module optical wattage figure before you buy.
Step 1: Choose the right laser technology
Hobby machines fall into distinct categories: diode lasers, CO2 lasers and fiber lasers. Each technology uses a different light wavelength, which decides what it can cut, what it can mark and how much space it requires. Our guide on diode vs CO2 laser machines explains these beam differences in detail.
Diode lasers are the standard starting point for home makers. Most entry-level diode units use semiconductor chips emitting blue light, fit on a standard desk and plug into household wall outlets. They handle wood, leather, dark acrylic, cardboard and coated metal blanks. For a wider view of available machines, visit the laser engraver hub.
CO2 lasers cut thick wood and clear acrylic and can mark glass, but require liquid cooling, bulky ventilation ducts and dedicated floor space. Fiber lasers mark bare metals but do not cut craft wood or acrylic. For a beginner setting up at home, a diode laser provides the most practical balance of capability and simplicity.
Step 2: Balance optical output power and spot size
Laser listings often state electrical input wattage alongside optical output power. Electrical input reflects the power drawn from the wall adapter, whereas optical output measures the actual beam power exiting the lens. When evaluating options, read our guide on how to choose a laser engraver.
Low-wattage diode lasers provide modest optical output intended primarily for surface marking and shallow detail work. For example, WIZMAKER lists a 2.5W diode laser module (2500mW) with a 0.04×0.04 mm spot size, while SCULPFUN lists a 3W module stating 3000mW output while explicitly noting that cutting is not recommended for its machine. These entry units excel at crisp photo engraving, custom paper tags and leather personalization because the fine 0.04mm spot creates clean, high-resolution lines.
Makers wanting faster engraving speeds or deeper cutting need greater optical wattage. ELIDOR lists a 6W (6000mW) laser module with a 0.04 × 0.14 mm spot, while ACMER lists a 6000mW diode laser featuring a 0.04mm spot and a 2mm focal length. Stepping up further, Artilume lists a 7W diode laser that cuts up to 4mm basswood with multiple passes. If your focus centers on timber crafts, review our guide to the best laser engraver for wood.
Step 3: Evaluate working area and machine dimensions
Working area determines the maximum size of blanks you can engrave in a single setup. Beginner engravers range from compact portable units to mid-sized desktop frames.
Compact engravers keep desk footprints small. WIZMAKER lists a 135×145 mm working area with an overall frame measuring 297×319×128 mm and a weight of 3.3 pounds. SCULPFUN lists a 150×130mm working area (5.9×5.1in) with a weight of 2.3 pounds. LaserPecker lists an adjustable stand with a 200 mm focusing distance set with an included ruler and a weight of 2.4 pounds. TOIREISX lists a 150×150 mm working area with a machine weight of 5 pounds.
Larger beds allow batching multiple items like coasters or larger wall signs. Artilume lists a 200x150mm working area, while ELIDOR lists a 300×300 mm (11.8″ × 11.8″) working area with a rated speed up to 10,000 mm/min. A larger bed takes more desk space but reduces the need to reposition materials between jobs.
Step 4: Check software and connection options
Software controls machine movement, laser power and processing speed. Before buying, verify which applications and computer operating systems the hardware supports. Our review of the best laser engraver for beginners covers models compatible with standard programs.
The standard programs for diode machines are LaserGRBL and LightBurn. LaserGRBL is a no-charge Windows program suitable for simple vector cuts and basic image engraving. LightBurn is a paid design and control suite compatible with Windows, macOS and Linux, offering advanced layout tools, multi-layer power settings and path optimization.
Most desktop engravers connect to a computer using a standard USB cable, which provides reliable data transmission during jobs. Some machines also offer local Wi-Fi or mobile smartphone apps for sending simple artwork wirelessly.
Step 5: Set up workspace ventilation and safety gear
Laser safety is essential from the first project. A laser beam vaporizes material by concentrating heat, which creates fire hazards and produces smoke containing airborne particles.
Ventilation must route fumes outdoors. Direct the exhaust through a flexible duct out a window, or connect the machine to a dedicated filtration unit. For filter options, see our fume extractor guide.
Eye protection requires certified eyewear matched to your laser module. Most craft diode lasers emit in the blue spectrum, with listings like TOIREISX and ACMER specifying 450±5nm and 455±5nm wavelengths. Your protective glasses must specify an optical density (OD) value covering that exact band. Tinted orange acrylic shields without a certified specification do not provide reliable eye protection. See our laser safety glasses guide for details.
Keep an extinguisher near your desk and never leave an operating laser unattended. Listing details also require careful inspection. For instance, the ATOMSTACK Swift Mini listing states both a 3W module and a 5mW laser output in its title while citing FDA Class 1, illustrating why shoppers must look closely at conflicting power numbers to confirm actual machine capabilities and required safety precautions. Open desktop frames typically meet a Class 4 safety standard, requiring protective glasses or an enclosure whenever the laser runs.
Step 6: Select safe beginner materials and avoid toxic plastics
Beginner materials should engrave cleanly without releasing corrosive fumes. Great options include basswood sheets, craft plywood, vegetable-tanned leather, dark acrylic, cardboard and paper. You can find project ideas in our guide to laser engraving projects for beginners.
Certain plastics must never go into a laser cutter. Avoid PVC, vinyl, PVC-based faux leather, polycarbonate and ABS. When subjected to laser heat, PVC and vinyl decompose to produce corrosive chlorine gas and hydrogen chloride, which can ruin optical lenses, corrode metal components and create severe respiratory hazards. Polycarbonate chars heavily and produces dense smoke, while ABS releases toxic fumes and fire hazards. Always confirm that craft materials are certified laser-compatible.
Step 7: Perform initial focus calibration and practice passes
Accurate focus ensures sharp marks and clean edges. Laser modules focus their light to a narrow beam waist where energy concentration is highest. If the module height is set incorrectly, the beam strikes the material out of focus, causing a wider kerf, reduced energy density, blurred details and incomplete cuts.
Most machines provide a focusing block, a stepped spacer or an adjustable column. Set the recommended gap between the lens and your material before starting. Keep scrap wood beside your machine to verify speed and power settings before engraving final blanks. Running practice passes on scrap stock ensures clean edges without burning your finished products.
Common mistakes to avoid
- Confusing electrical input wattage with optical laser output power.
- Operating an open-frame laser without certified eye protection matched to the beam wavelength.
- Leaving an active engraving or cutting job unattended.
- Attempting to engrave hazardous plastics like PVC, vinyl, polycarbonate or ABS.
- Skipping ventilation and letting smoke build up in an enclosed room.
- Engraving finished blanks before checking focal height and power settings on scrap material.
Laser engraver for beginners: the short version
- Choose a diode laser with verified optical wattage suited to your craft goals.
- Select a workspace size that accommodates your intended blank dimensions.
- Set up outdoor exhaust ventilation and keep a fire extinguisher nearby.
- Wear certified safety glasses matched to your machine beam wavelength.
- Connect using LaserGRBL or LightBurn on your computer.
- Calibrate optical focus and run practice passes on scrap wood before making final items.
Starting with laser engraving is simple when you respect the process: verify optical power, vent the smoke, wear proper eye protection and practice on scrap stock before engraving finished blanks.
FAQ: lasers and CNC
What is a good laser engraver for beginners?
A good laser engraver for beginners is an easy-to-assemble desktop diode machine with verified optical output, compatibility with LaserGRBL or LightBurn, and essential safeguards like tilt shutoff. A low-wattage diode unit handles wood, leather and dark acrylic while remaining straightforward to operate on a home craft desk.
What is the best laser engraver for beginners starting a small craft shop?
For beginners starting a small business, the best laser engraver offers sturdy frame construction, a larger bed for batching blanks, and responsive support. Makers planning to sell custom goods should read our recommendations in the best laser engraver for small business guide.
Can a beginner laser engrave metal?
Diode lasers cannot directly etch bare reflective metals like brass, raw aluminum or copper because the beam reflects away. Beginners can mark anodized aluminum, painted metal blanks and powder-coated drinkware. For bare metals, applying a laser marking spray allows some diode engravers to leave dark marks, while directly marking bare steel without coatings requires a specialized fiber laser.
What software do beginner laser engravers use?
Most beginners use LaserGRBL or LightBurn. LaserGRBL is free for Windows and handles basic cuts and image engraving. LightBurn is a paid program for Windows, macOS and Linux that provides full design tools, multi-layer controls and job optimization.
Is a laser engraver safe to use at home?
A laser engraver is safe for home use when operated carefully. Always exhaust smoke outdoors or through a dedicated fume filter, wear certified protective glasses matching the laser wavelength, keep an extinguisher within reach, and never leave an active job unattended.
What materials should beginners avoid?
Beginners must never cut or engrave PVC, vinyl, PVC-based faux leather, polycarbonate or ABS. When burned by a laser, PVC and vinyl release corrosive chlorine gas that damages machine optics, while polycarbonate and ABS generate dense toxic smoke and fire hazards.
Related: the laser engraver hub, best laser engraver for beginners, and how to choose a laser engraver. Also see our best laser engraver for wood and best laser engraver for small business.



