Roller vs Chuck Rotary Attachment: Which One Should You Buy?
A complete comparison of roller and chuck rotary attachments for laser engraving, explaining how each mechanism works, which objects it holds, and how to choose.

On this page
Top picks at a glance
As an Amazon Associate I earn from qualifying purchases.
- 1
 Dremel 4000-2/32 Rotary Tool Kit9.7/10View on Amazon
- 2
 Dremel Stylo+ 2050-15 Rotary Tool Kit with 15 Accessories9.4/10View on Amazon
- 3
 HARDELL Mini Cordless Rotary Tool9.4/10View on Amazon
- 4
 Longer Rotary Roller SeriesView on Amazon
- 5
 Longer Laser Engraver Rotary RollerView on Amazon
- 6
 ACMER M4 Laser Rotary RollerView on Amazon
- 7
 ACMER M3 Laser Rotary RollerView on Amazon
- 8
 Longer Chuck Rotary Roller is Ideal for Engraving CylindricalView on Amazon
- 9
 Rotary Roller ProView on Amazon
Engraving cylindrical projects like custom drinkware, stainless tumblers, glass bottles and ceramic mugs is a reliable way to expand a small laser workshop. When deciding between a roller vs chuck rotary attachment, your choice depends on workpiece symmetry and workholding. A roller rotary attachment supports straight cylinders on motorized wheels, making it ideal for fast batch loading on uniform tumblers and bottles. A chuck rotary attachment clamps blanks from the rim or base using mechanical jaws, securing tapered drinkware, mugs with handles, spheres and rings that slip on rollers. The sections below explain each factor step by step so you can select the rotary mechanism that fits your blanks.
Other machines to compare
 Longer Rotary Roller SeriesCheck price on Amazon
 Longer Laser Engraver Rotary RollerCheck price on Amazon
 ACMER M4 Laser Rotary RollerCheck price on Amazon
 ACMER M3 Laser Rotary RollerCheck price on Amazon
 Longer Chuck Rotary Roller is Ideal for Engraving CylindricalCheck price on Amazon
 Rotary Roller ProCheck price on Amazon
LaserEngraveHQ earns a commission from purchases made through these links, at no extra cost to you. Read our affiliate disclosure.
Rotary attachments connect by replacing the Y-axis stepper motor cable or plugging into a dedicated rotary port. Because rotary mechanisms elevate the workpiece, verify machine vertical clearance and cable compatibility before purchasing.
Step 1: Understand how each rotary mechanism drives the workpiece
The primary distinction between rotary styles lies in how motion transfers from motor to workpiece. A roller rotary attachment relies on friction drive. Parallel rubber-coated wheels support the workpiece by gravity. When the stepper motor turns the drive roller, surface friction rotates the cylinder beneath the laser focal point. Because no jaws obstruct the ends, you can slide cylinders onto the wheels and begin engraving immediately.
A chuck rotary attachment relies on mechanical clamping. The workpiece is gripped by mechanical clamping jaws on a central rotating headstock, similar to a miniature lathe. These jaws expand outward to grip a hollow rim or contract inward around an exterior base. Because jaws physically lock the item, it cannot slip or drift during rotational acceleration. See our laser engraver accessories for beginners overview for more on workshop fixtures.
Step 2: Match attachment mechanics to your workpiece shapes
Workpiece geometry dictates which rotary mechanism will succeed. Roller attachments perform well on balanced, uniform cylinders with consistent outer diameters from end to end. Straight stainless steel tumblers, aluminum cans, glass bottles and cylindrical dowels rotate smoothly on rollers without drifting. For makers producing straight drinkware from our best water bottles for laser engraving guide, rollers offer simple operation.
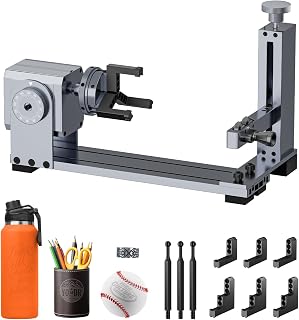
Challenging shapes require a chuck rotary attachment. Tapered tumblers walk lengthwise along rollers because the wider rim travels faster than the narrow base. Mugs with handles cannot rotate on rollers because the handle strikes the frame. Spheres, ornaments and rings lack the cylindrical surface contact required for friction drive. Creality addresses these shapes on its Rotary Roller Pro by including 3 sets of grippers (Trapezoidal, L-shaped, and Hexagonal) to hold regular cylinders from 1-110 mm, shaped drinkware like mugs with handles and tumblers from 25-75 mm, spheres from 10-130 mm, and rings from 15-100 mm.
Step 3: Evaluate diameter capacity and vertical clearance
Before selecting a rotary unit, check diameter capacity against your project blanks. Roller attachments accommodate a wide range of cylindrical sizes through sliding roller adjustments. For instance, Longer lists its rotary roller with an adjustable engraving range from 6 mm to 300 mm, featuring a 70A anti-slip rubber shaft and an item weight of 2.94 pounds. Similarly, ACMER lists its M4 roller module with an adjustable spacing range of 3–150mm, and its M3 roller module with an adjustable diameter range of 6–164mm and an item weight of 1.87 pounds.
Chuck attachments are bounded by jaw travel and chuck diameter. xTool lists its RA3 chuck attachment with an enlarged 130mm chuck, while its RA2 Pro measures 7.4 x 3.7 x 18 inches. Creality lists its Rotary Roller Pro with dimensions of 14 x 4.8 x 3.9 inches and an item weight of 5.04 pounds. Adding any rotary attachment consumes vertical Z-axis height. Desktop laser frames require riser feet or a dropped bed to maintain focus. Longer notes that its rotary assemblies require 12Pcs risers beneath frame machines. See our guide on how to use xTool rotary attachment for mounting details.
Step 4: Check connector wiring and machine compatibility
Rotary attachments operate by substituting the rotary stepper motor for your engraver’s Y-axis motor. While stepper motors use standard pulse signals, physical connectors and wiring pinouts vary across brands. Connecting an incompatible plug can prevent rotation or cause the motor to jitter.
Many manufacturers provide universal wiring harnesses or adapters. Creality equips its rotary kit with a PH2.0-6P (6 PIN) interface and states compatibility with 95% of laser engraver machines. Longer provides dual connection options on its roller, featuring a WHITE connector compatible with Longer RAY5 and Laser B1 series and approximately 80% of engravers, along with a BLACK connector accommodating the remaining 20%. ACMER includes two connection cables with its M3 rotary module to support both proprietary ports and third-party lasers. If a motor turns backward during setup, reversing the axis direction in your software corrects rotation.
Step 5: Compare workflow speed for single jobs and batches
For high-volume production of identical straight drinkware, a roller rotary attachment offers unmatched handling speed. Swapping blanks requires only lifting the finished cylinder off the rollers and setting down a fresh blank. You do not need to loosen screws or adjust jaws between pieces, minimizing downtime across large orders.
A chuck rotary attachment requires manual clamping per piece, but mechanical clamping delivers higher stability during rapid vector marking. An unsecured tumbler on rollers can slip if the motor accelerates aggressively. The mechanical grip of a chuck allows faster rotary speeds without risk of displacement. For example, xTool lists a maximum vector engraving speed of 360°/s and a minimum angle of 0.45° for its RA2 Pro stepper drive, ensuring precise detail across intricate graphics without missed rotational steps.
Step 6: Configure software settings and rotation steps
Proper software configuration ensures your designs engrave at accurate proportions. In programs like LightBurn and LaserGRBL, you must enable rotary mode and specify whether you are operating a roller or a chuck. Consult our LightBurn vs LaserGRBL comparison and our tutorial on how to set up LightBurn for a diode laser for general setup guidance.
For a roller rotary attachment, the software calculates motion based on roller diameter and motor steps per rotation. Once calibrated, surface speed matches gantry speed, so you only enter object diameter to establish graphic wrap boundaries. For a chuck rotary attachment, the chuck rotates by angular degrees. You must measure the exact outer diameter of each blank with calipers and enter that value into the software before engraving so graphics do not stretch or overlap.
Step 7: Choose between dedicated units and modular systems
Makers must decide whether to invest in a single-purpose attachment or a modular system. If your business focuses strictly on straight drinkware, a dedicated roller rotary attachment provides a straightforward fixture. Standalone units like the Longer roller kit weigh 2.94 pounds, offering easy storage and quick placement.
If customer orders include stemmed glassware, mugs with handles, rings or ornaments, a convertible kit provides greater versatility. Several brands offer multi-module packages combining roller and chuck setups. xTool offers its RA2 Pro as a 4-in-1 system supporting roller, chuck, sphere and ring configurations, while its RA3 features magnetic quick-swap attachments backed by a 12 Months manufacturer warranty. Longer also produces 3-in-1 rotary kits that switch between roller and chuck modules. When selecting gear, consider machine capabilities in our guide on how to choose a laser engraver.
Common mistakes to avoid
- Running tapered tumblers on parallel rollers without a leveling support, which causes the blank to walk lengthwise and misalign passes.
- Failing to install riser feet or remove the honeycomb bed, resulting in a physical collision between the laser head and the rotary frame.
- Entering roller diameter instead of workpiece diameter in software settings when operating in chuck mode.
- Over-tightening chuck jaws against thin-walled metal cups or fragile glass blanks, causing surface dents or structural cracks.
- Skipping a dry framing pass with the laser beam disabled to confirm rotational clearance and ensure cables do not snag.
Roller vs chuck rotary attachment: the short version
- Buy a roller rotary attachment if you primarily engrave straight, uniform cylinders like straight tumblers, bottles, and cans.
- Buy a chuck rotary attachment if your projects include tapered drinkware, mugs with handles, goblets, spheres, or rings.
- Measure your machine clearance and install riser feet before mounting any rotary attachment under your laser head.
- Verify motor connector pinouts between your laser control board and the rotary stepper cable to ensure proper axis motion.
- Calibrate roller wheel diameter for roller units, or measure exact blank diameter for chuck units, within your control software.
- Perform a dry framing pass before every engraving job to verify rotation clearance, cable slack, and blank stability.
For makers producing uniform drinkware in volume, a roller rotary attachment delivers unmatched loading speed. For artisans tackling diverse, irregular blanks with zero slip, a chuck rotary attachment provides the mechanical grip necessary for clean results.
FAQ: lasers and CNC
Can a roller rotary attachment engrave tapered tumblers?
Tapered tumblers tend to walk lengthwise on parallel rollers because the wider rim travels faster than the narrow base. While some roller attachments include an adjustable support wheel to level the top engraving line, steep tapers can still lose traction. A chuck rotary attachment clamps the object firmly, preventing walking and maintaining alignment throughout rotation.
Do I need riser feet to use a rotary attachment?
Yes. Rotary attachments sit on top of your workspace base, elevating the workpiece surface. Most desktop laser engravers require riser feet or a dropped bed enclosure to provide adequate vertical clearance between the laser lens and the top of your tumbler.
Why are my rotary engravings stretched or squished?
Distorted engravings happen when the rotary steps per rotation or workpiece diameter settings in your software do not match the physical attachment. Calibrate the rotary axis in your control software by engraving a square shape onto a practice cylinder and adjusting the step value until the engraved dimensions match the software file.
Can I engrave mugs with handles on a roller rotary?
Mugs with handles cannot rotate on standard rollers because the protruding handle strikes the roller frame during rotation. A chuck rotary attachment holds the mug by the rim or interior base, suspending the handle in open air so the laser can engrave the exposed face cleanly.
Which software works best with laser rotary attachments?
LightBurn and LaserGRBL are the primary software programs used for rotary engraving. LightBurn provides dedicated rotary setup tools for both roller and chuck modes, allowing quick diameter entry, framing pulses, and axis direction reversal.
Can a rotary attachment engrave glass without cracking it?
Yes, rotary attachments engrave glass bottles, drinking glasses, and goblets cleanly when used with appropriate laser settings. Because glass absorbs thermal energy quickly, using paper masking, marking spray, or a damp paper towel helps dissipate heat and prevents thermal fracturing during rotation.
Related: the laser accessories hub, how to set up a rotary on a laser engraver and how to engrave a tumbler with a rotary. Also see our guide to the best tumblers for laser engraving and the best laser engraver for tumblers.