DIY CNC Router Kit: A Step-by-Step Starter Guide
A complete step-by-step guide to choosing, building, and running a DIY CNC router kit: compare frames, drive mechanics, spindle power, and control software.

On this page
Top picks at a glance
As an Amazon Associate I earn from qualifying purchases.
- 1
 CNCTOPBAOS 3018-PRO CNC Router Engraving Machine w/GRBL9.5/10View on Amazon
- 2
 VEVOR CNC Router Machine9.5/10View on Amazon
- 3
 Genmitsu CNC 3018-PRO Router Kit9.5/10View on Amazon
- 4
 RATTMMOTOR Upgrade 3018-PRO CNC Wood Router Machine Kit 3View on Amazon
- 5
 Genmitsu 2PCS T-Track Mini Hold Down Clamp KitView on Amazon
- 6
 Genmitsu 4PCS T-track Mini Hold Down Clamp KitView on Amazon
- 7
 WORKPRO 6.5 Amp Compact Router Combo KitView on Amazon
- 8
 FoxAlien 4080 Y-axis Extension Kit for Masuter ProView on Amazon
- 9
 Genmitsu 4 Pack Hold Down Clamp KitView on Amazon
A DIY CNC router kit is an unassembled package of structural extrusions, linear motion components, stepper motors, a control board, and a spindle mount or motor that you assemble in your workshop. Instead of buying an expensive pre-built machine, assembling a diy cnc router kit gives you direct control over machine rigidity, working dimensions, and future upgrades. This guide breaks down the process step by step, from comparing frame designs and drive mechanics to wiring electronics and running your first cuts.
Other machines to compare
 RATTMMOTOR Upgrade 3018-PRO CNC Wood Router Machine Kit 3Check price on Amazon
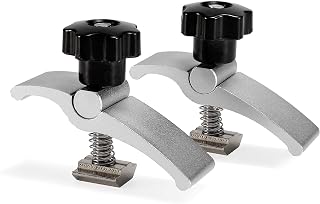 Genmitsu 2PCS T-Track Mini Hold Down Clamp KitCheck price on Amazon
 Genmitsu 4PCS T-track Mini Hold Down Clamp KitCheck price on Amazon
 WORKPRO 6.5 Amp Compact Router Combo KitCheck price on Amazon
 FoxAlien 4080 Y-axis Extension Kit for Masuter ProCheck price on Amazon
 Genmitsu 4 Pack Hold Down Clamp KitCheck price on Amazon
LaserEngraveHQ earns a commission from purchases made through these links, at no extra cost to you. Read our affiliate disclosure.
Building a kit requires mechanical patience and careful alignment. We do not manufacture these machines, so this guide reviews published specifications from maker listings and explains assembly fundamentals without promotional claims.
Step 1: Choose the frame size and working area
The footprint of a router kit decides what size projects you can make, from small nameplates to large signs. Entry-level desktop models provide a compact benchtop workspace. For example, maker listings for the Genmitsu CNC 3018-PRO publish an XYZ working area of 300 x 180 x 45 mm, overall machine dimensions of 7.09 inches wide by 11.81 inches high, and an item weight of 15.3 pounds. This footprint fits on a small desk for carving signs, acrylic plates, and prototype circuit boards.
If you need more clearance or a larger bed, benchtop models offer expanded capacity. Manufacturer specifications for the LUNYEE 3020 Nova list dimensions of 16.1 inches wide by 20.4 inches high with an overall weight of 19.2 kg. For larger decorative signs, the FoxAlien XE-Ultra 8080 publishes an XYZ workspace measuring 33 x 33 x 4.72 inches (with outer dimensions listed at 33.07 inches wide by 4.72 inches high in its spec table), a 5.3-inch pass height, and a weight of 40 kg. Review our desktop CNC machine for beginners guide to match workspace dimensions to your stock.
Step 2: Compare drive mechanics and linear rails
Rigidity and drive precision dictate whether your machine cuts clean details or suffers from chatter and deflection. Entry kits often rely on smooth steel guide rods and basic lead screws. While suitable for light carving, supported profile rails and precision ball screws provide higher repeatability when cutting dense stock.
Manufacturer listings show clear differences in motion hardware. The Genmitsu 3030-PROVer Ultra specifies HG15 dual linear rails alongside 1204 ball screws across each axis, with the maker advertising precision within ±0.03mm. The LUNYEE 3020 Nova similarly incorporates HG-15 linear guides and 1204 ball screws on its X, Y, and Z axes, listing motion accuracy of ±0.05mm and travel speeds up to 5,000mm/min. On large-format assemblies, makers often select heavier profiles and drive screws: the FoxAlien XE-Ultra 8080 pairs a 46 x 80mm aluminum profile frame with HG-15 linear rails, using 16mm ball screws for the XY axes and 12mm ball screws for the Z axis to maintain stability at speeds reaching 5,000mm/min. Compare motion components in our best desktop CNC for beginners roundup to see how rail designs influence cutting performance.
Step 3: Match spindle power to your cutting materials
The spindle delivers rotational cutting power to your end mill. A spindle with insufficient wattage or low torque will bog down in dense hardwood or stall during metal milling. Different kit tiers provide distinct power ratings tailored to specific material types.
For light relief carving and circuit board isolation, compact DC spindles are common. The Genmitsu CNC 3018-PRO listing publishes a 120-watt spindle operating on 24 volts with rotational speeds reaching 20,000 rpm. Stepping up to demanding carving tasks requires greater spindle output. The Genmitsu 3030-PROVer Ultra listing publishes a 710-watt digital spindle with a spec table listing 230 volts. In the same performance class, the LUNYEE 3020 Nova lists an 800-watt spindle (rated at 1 hp in its spec table) operating at 48 volts, providing constant torque control and rotational speeds from 6,000 to 30,000 RPM across 6 speed settings.
For heavy timber or aluminum fabrication, open kits let you choose your motor. The FoxAlien XE-Ultra 8080 includes a 65mm clamp for palm routers, with documentation noting compatibility with an optional 1.5kW VFD spindle. Meanwhile, benchtop mills like the MAKERA CARVERA Carvera Air feature an enclosed closed-loop spindle covering 0 to 13,000 RPM with spindle runout rated under 0.01mm. Our budget CNC router comparison outlines what spindle capabilities each tier delivers.
Step 4: Wire the controller, stepper motors, and drivers
The motion controller receives G-code commands from your computer and directs electrical current through stepper motor drivers to move each axis. Reliable wiring, adequate power supplies, and proper motor sizing prevent lost steps during a cut.
DIY electronics kits range from basic hobby shields to industrial multi-axis drivers. Entry setups often use open-source boards: the Kuman Professional CNC Kit listing includes an Arduino expansion shield (Version 3.0) driven by an ATmega328 microcontroller, four DRV8825 stepper motor drivers, and three NEMA 17 stepper motors delivering 84 oz. in (59 Ncm) of holding torque with a 1.8 degree step angle. For larger gantry machines requiring more muscle, the RATTMMOTOR controller kit provides Nema23 stepper motors (model 23HS2430B) delivering 425 oz-in (280 Ncm) holding torque at 3.0A current with a 1.8 degree step angle and motor dimensions of 57 x 57 x 112mm. That package pairs with DM556S digital drivers supporting 200 to 51,200 subdivision, powered by a 400W 36V main switching power supply and a 75W 24V supply. The FoxAlien XE-Ultra 8080 incorporates closed-loop stepper motors delivering 2.6 N.m torque with step-loss protection and a 32-bit control box.
Step 5: Assemble the physical frame and square the axes
Mechanical assembly forms the foundation of machine accuracy. If the base frame or gantry uprights are bolted together out of square, every cut you make will exhibit parallelogram distortion that software cannot fix.
Work on a flat, sturdy surface. Assemble the aluminum base extrusions loosely, measure diagonally across opposite corners to confirm squareness, and tighten fasteners progressively in an alternating pattern. Some kits streamline this mechanical stage: maker listings for the Genmitsu 3030-PROVer Ultra state that the machine ships as 2 pre-assembled modules to reduce assembly time, while the LUNYEE 3020 Nova arrives with wiring pre-connected so users only attach the Z-axis module. When attaching linear rails and drive screws, slide the carriage back and forth by hand along the full stroke before torquing screws to ensure there is no mechanical binding.
Step 6: Choose router bits and set up workholding
Holding your raw material securely and selecting the correct cutting tool are critical for clean edge finishes and operator safety. Unlike hand routing, a CNC tool exerts lateral and vertical cutting loads that can dislodge loose workpieces, causing chatter or throwing stock off the bed.
Collet capacity and shank diameter dictate which tooling your spindle accommodates. Multi-piece starter sets let you tackle diverse carving tasks. For example, the EANOSIC 9-piece router bit set includes 1/4-inch shank solid carbide bits with nano blue coating, featuring 60-degree and 90-degree V-groove bits alongside spiral end mills. The Eyryfui 10-piece set similarly provides 1/4-inch shank carbide tooling with a 0.5-inch cutting length for grooving and mortising. Dedicated collet packages like the LUNYEE 1/4″ Shank CNC Router Bits Essential Kit supply an ER11 collet paired with a 30-degree V-bit and spiral end mills. For specialized three-dimensional work, advanced platforms like the MAKERA CARVERA Carvera Air accommodate an optional 4th-axis rotary module with a capacity of 3.6 inch diameter by 7.9 inch length (9.2cm x 20cm) for cylindrical carvings. Explore our dedicated CNC tooling guide to understand bit geometries and feed rate principles.
Step 7: Configure control software and cut your first project
The software toolchain bridges your digital design and physical machine motion. A standard CNC workflow requires CAD software to create the dimensional geometry, CAM software to calculate toolpaths and output standard G-code, and a machine controller application to send coordinates to the router over a USB or offline connection.
Most hobby kits utilize open-source GRBL firmware. Maker documentation for Genmitsu and LUNYEE machines notes broad compatibility with control programs like Candle, Universal Gcode Sender (UGS), and Easel, while also supporting toolpaths generated in design suites like Fusion 360. Industrial-style controller packages like the RATTMMOTOR kit support Mach3 motion control software over USB. Before starting a cut, establish your work coordinate origin by touching off your cutting bit against the workpiece surface to zero the X, Y, and Z axes. Raise the spindle above the material, execute a dry run in the air to confirm travel limits and clearance planes, and then begin your carving pass with conservative feed rates.
Common mistakes to avoid
- Tightening frame fasteners before measuring diagonal distances to confirm squareness.
- Setting excessive depth per pass or aggressive feed rates that stall the spindle motor.
- Using worn collets or failing to tighten the collet nut securely, causing bit slippage.
- Skipping a dry air run before carving, leading to clamp strikes or travel limit collisions.
- Leaving active cutting operations unattended without an emergency stop switch within reach.
DIY CNC router kit: the short version
- Select a workspace size and frame construction matching your stock materials.
- Choose linear guide rails and ball screws for maximum cutting rigidity.
- Match spindle wattage and RPM range to the density of your carving stock.
- Assemble the aluminum frame on a flat surface and verify all axes are square.
- Wire stepper motors, drivers, limit switches, and emergency stop circuits.
- Secure the material, zero work coordinates, and run a conservative trial cut.
FAQ: lasers and CNC
How difficult is it to assemble a DIY CNC router kit?
Assembly difficulty depends on the machine design. Modular kits arrive with pre-wired components and assembled sub-modules that go together in an afternoon with basic hex wrenches. Open-frame kits require assembling extrusions, routing drag chains, mounting linear rails, and wiring driver terminals, which demands patient mechanical squaring and careful electrical verification.
What materials can a desktop DIY CNC router cut?
A desktop router cuts softwoods, hardwoods, plywood, MDF, machinable plastics, and cast acrylic. When equipped with a rigid metal frame, supported linear rails, and adequate spindle power, machines can also mill non-ferrous metals including brass and soft aluminum using shallow passes and appropriate lubrication.
What software do I need to run a DIY CNC router?
You need CAD software to draw your project, CAM software to assign cutting paths and generate G-code, and a G-code sender to transmit instructions to the machine controller. Many makers begin with accessible web tools or open-source sender utilities before progressing to advanced parametric suites.
Can a DIY CNC router cut aluminum?
Yes, but cutting aluminum demands machine rigidity, minimal spindle runout, and conservative feeds and speeds. Machines equipped with supported linear rails, ball screws, and high-wattage spindles handle aluminum effectively when paired with single-flute carbide end mills and proper chip clearing.
What is the difference between lead screws and ball screws?
Lead screws use sliding friction between a threaded rod and a nut, which can develop backlash over extended use. Ball screws circulate miniature ball bearings between the screw threads and nut, reducing friction, substantially minimizing backlash, and maintaining tighter positioning repeatability under cutting loads.
Do I need an enclosure or dust collection system?
CNC routing generates substantial wood dust, airborne chips, and noise. While an enclosure is not strictly mandatory, adding a dust shoe connected to a vacuum and operating within an enclosed space keeps airborne particles out of your shop and significantly dampens high-frequency motor noise.
Related: the CNC router hub, desktop CNC routers and 4×4 and larger CNC routers. Also see our desktop CNC machine for beginners guide, the best desktop CNC for beginners roundup, our budget CNC router comparison and our guide to CNC tooling.